Macros for standard documentsVersion 11-October-2007.
All the macros presented here can be invoked from the LaTeX.bsh dialog (a small icon represents the corresponding button). These macros can also be invoked from the Macros > LaTeX menu (the name of the macro is given in the corresponding button syntax).
|

| TOP |
 Mark main file of project
 |
The button "Master" (first panel) adds the master file name at the end of .tex files in order to avoid the definition of a project. This information is useful for compilation (latex, bibtex, pdflatex), for viewers and more generally for most actions defined in the commands panel. |
Button syntax for invoking this macro:
{"lt", "Macros.getMacro(\"LaTeX/latexMarkers\").invoke(view);", "Markers"},
| TOP |
 Link files dialog
The button "Link" (first panel) opens the jEdit file browser for insertion of images (.eps, .pdf), .bib or .tex files (the .tex files must be in the same directory as the main file). For images, a centered figure environment with caption field and a default label is inserted at the caret position.
Button syntax for invoking this macro:
{"lt", "Macros.getMacro(\"LaTeX/latexBrowseAndLink\").invoke(view);", "Link"},
| TOP |
 Add markers for navigation using the Markers menu
 |
The button "Markers" (first panel) adds markers in front of \chapter{, \section{ etc... (see screenshot) of .tex files for navigation using the jEdit Markers menu. If the first checkbox is unchecked, existing markers are preserved. In the history field just above the "Add/remove" button you can define your own regular expression (if you want to store it press the "enter" key). The number of markers added in this way is limited to fifty. |
Button syntax for invoking this macro:
{"lt", "Macros.getMacro(\"LaTeX/latexMarkers\").invoke(view);", "Markers"},
| TOP |
 Environments list
 |
The button "List" (second panel) opens a dialog displaying a list of LaTeX environments for insertion around selected text. For efficiency, I considered that it was better to keep redundant buttons for environments used very often (e.g., center). |
Button syntax for invoking this macro:
{"lt", "Macros.getMacro(\"LaTeX/latexEnvironments\").invoke(view);", "Env. list"},
| TOP |
Defining chapters, sections,...
 |
The macro latexSectionings is invoked from the button "List of" (in this case a dialog will display the list of sectioning possibilities) or indirectly from the buttons "Chapter" to "ssSec.". If you want a default label, select first the text corresponding to the desired sectioning title before invoking the macro (the default label can be modified by editing the file latexSectionings.bsh). |
Button syntax for invoking directly this macro:
{"lt", "Macros.getMacro(\"LaTeX/latexSectionings\").invoke(view);", "Sectioning"},
| TOP |

 Section to chapter and so on, and converse
Macro useful when you convert an article to a report [section, subsection, ....] becomes [chapter, section, ...]. Conversely, when you convert a report to an article, [chapter, section, ...] becomes [section, subsection, ....].
The transformation is applied to the selected text. If no text is selected, the transformation is applied to the whole buffer after confirmation.
Button syntax for invoking directly this macro with "section to chapter" option:
{"lt", "jEdit.setProperty(\"sectionToChapterChoice\",\"++\"); Macros.getMacro(\"LaTeX/latexSectionToChapter\").invoke(view);", "Sec++"},
or with "chapter to section" option:
{"lt", "jEdit.setProperty(\"sectionToChapterChoice\",\"--\"); Macros.getMacro(\"LaTeX/latexSectionToChapter\").invoke(view);", "Sec--"},
| TOP |
 Insert reference or page reference
This macro can be invoked only is the label file is open in a buffer. The label file is generated by parsing the project using the "Parse" button of the "Cmds" panel (requiring Perl).
Procedure:
- Set active the buffer containing the label file and move the caret on the line containing the reference to be copied in the LaTeX document.
- Then set active the buffer containing the LaTeX document, move the caret where you want to insert the reference and click the button "\ref{}".
Depending where is located the caret on the line containing the reference to be copied, the reference inserted will be either \ref{some_label} (with parenthesis for equations) or page \pageref{some_label} or \ref{some_label} (page \pageref{some_label}).
Button syntax for invoking this macro:
{"lt", "Macros.getMacro(\"LaTeX/latexSectionToChapter\").invoke(view);", "\ref{}"},
| TOP |


 Itemize, enumerate, description
This macro should be used after the text to be "itemized" is written in a buffer. It suffices to separate items by a blank line, to select the block of relevant lines and to click one of the three buttons. Alternatively, you can select some blanks lines (several \item's defined in the itemize environment) before clicking or even don't select anything (a single \item defined in the itemize environment).
The indentation depends on the caret position at the selection start. If you have more than one level of itemization, for good indentation use this macor starting from the inner itemize environments toward the outer one.
Button syntax for invoking this macro:
{"lt", "jEdit.setProperty(\"itemizeChoice\",\"itemize\"); Macros.getMacro(\"LaTeX/latexItemize\").invoke(view);", "Itemize"},
(similar for enumerate and description, replace the jEdit property).
| TOP |
 Font sizes
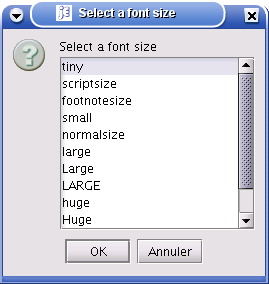 |
The button "Sizes" opens a dialog displaying the list of available font sizes for insertion of the corresponding environment. For efficiency, I considered that it was better to keep redundant buttons for font sizes used very often (e.g., small). |
Button syntax for invoking this macro:
{"lt", "Macros.getMacro(\"LaTeX/latexFontSize\").invoke(view);", "Sizes"},
| TOP |
 Matrix wizard
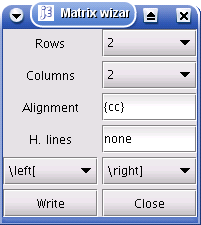 |
The button "Array" (Math1 panel) opens a dialog for defining matrices (in math mode). There are shortcuts for filling the "alignment" field, for example, chose the number of columns and type l (press the "enter" key) or |r| (press the "enter" key) There are shortcuts for filling the "H. lines" field, for example, chose the number of row and type any string containing a for "all" (press the "enter" key). Note that 0 is for an horizontal line above the first row. |
Button syntax for invoking this macro:
{"lt", "Macros.getMacro(\"LaTeX/latexArray\").invoke(view);", "array"},
| TOP |
 Table wizard
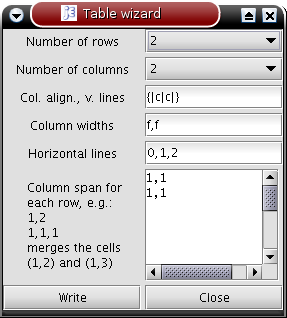 |
The button "Tabular" (Gene1 panel) opens a dialog for defining a table (tabular environment). There are shortcuts for filling the "Col. alignment" field. "Exercise": choose the number of columns and type l (L lower case) and press the "enter" key or |r| and press the "enter" key. The "Column width" field is in fact redundant with the above one. The string f means free width, otherwise indicate the width in a unit accepted by LaTeX, e.g., f,3cm,f for a width of 3cm of the second column. Note that the macro combines both redundant fields in order to generate a string supported by LaTeX. |
There are shortcuts for filling the "Horizontal lines" field. "Exercise": choose the number of rows and type any string containing a for "all" and press the "enter" key. Similarly n means "none". Note that 0 is for an horizontal line above the first row.
The "column span" field is assumed to be intuitive....
The tabular environment is quite rich: documentation. The proposed wizard offers only a limited number of tabular features. You can try some additional clipper commands:- Clipper commands of the "Gene2" tab: buttons "resize" (add space around the table), "@{}", "cline" and "multirow" (for multirow you must declare the multirow package \usepackage{multirow}).
- In addition, it is possible to colorize rows, columns, cells
and lines using the clipper commands of the "Pres" tab: buttons "Row color", "Col color",
"Cell color" and "Lines color".
- These four clipper commands require the table option of the xcolor package (\usepackage[table]{xcolor} for standard classes, or for the Beamer class \documentclass[xcolor=table]{beamer}).
- Note that muticolumn and multirow are not fully supported by these four clipper commands.
However, you can insert the cell color command inside a multicolumn command as follows:
\multicolumn{3}{|c|}{\cellcolor{Peach} Some text}.
Button syntax for invoking this macro:
{"lt", "Macros.getMacro(\"LaTeX/latexTabular\").invoke(view);", "Tabular"},
| TOP |